


First, Why I Made This Tutorial
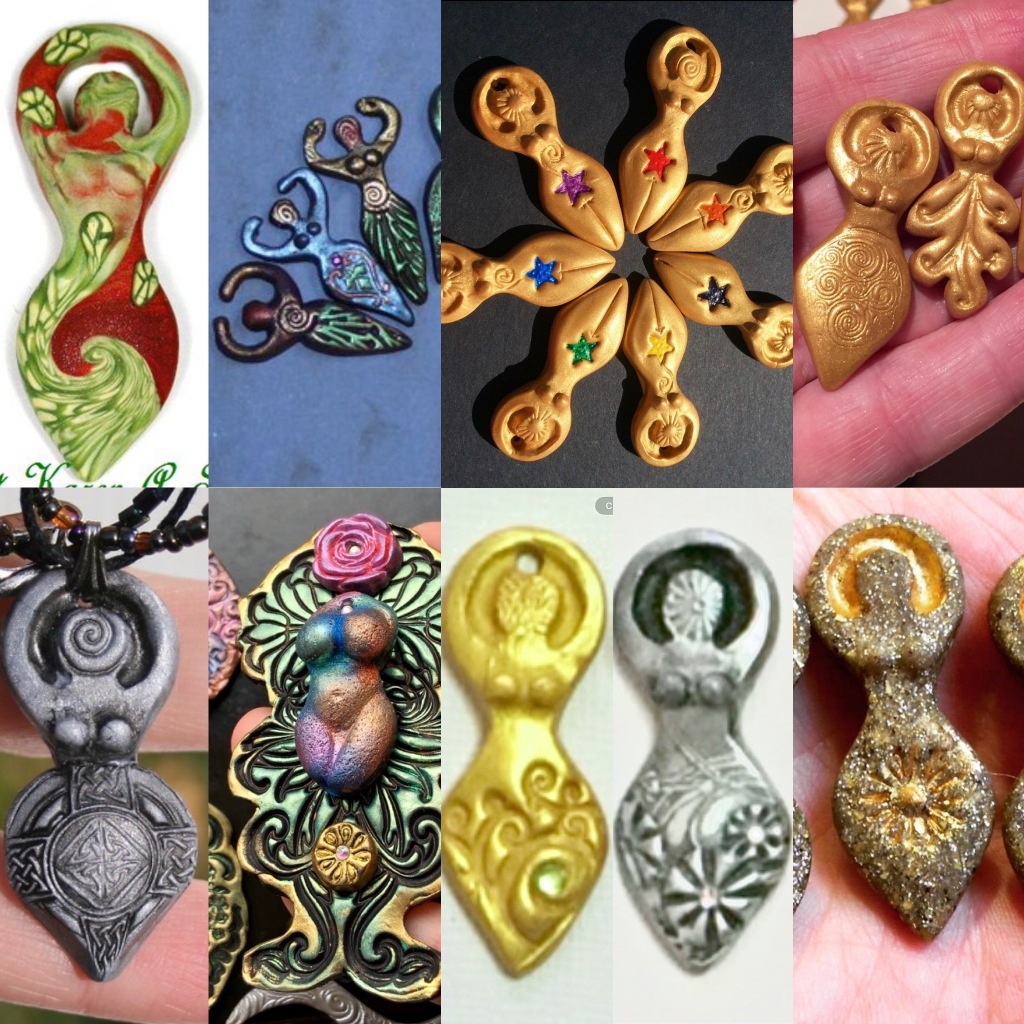
Hi, I’m the artist, Karen A. Scofield, and I live in Kenosha, WI. I made this tutorial after finding thousands of Pinterest pins that showed my previously published goddess pendants, the ones shown above against a blue background. These pins linked to a stranger’s page, used my photo, and inferred these can be made from homemade cornstarch and baking soda clay. No. No they can’t. Also, my photos are copyrighted, they didn’t have permission to use them, and they did not respond to my request for them to take my photo off their page.
My above beads with the blue background have been on my sari0009 flickr account since 2008 and appeared in the blurb book Polymer Artists Showcase, by Tejae Floyde. (Tejae Floyde has a wonderful site and blog and has her work published in numerous magazines and books.) My goddess pendants were 2″ tall and I used professional grade polymer clay. Their surfaces were colored with mica powders, then sealed. My Youtube Video After the Pinterest Discovery: http://youtu.be/Md9Y_o0jM2g
But why do I make goddess pendants anyway? I left my domestic abuser behind in ’94, took back my bodily autonomy, and learned to respect myself and demanded respect of others. These beads are symbolic of honoring and respect. They were kind of inspired by some very differently styled goddess pendants I saw in the Shakti Books & Gifts, on State Street in Madison, Wisconsin (which sadly has been permanently closed for a while now). Those may have been porcelain or bone, I’m not sure which, I couldn’t afford one at the time anyway. So I decided to start making my own, my way.
You may want to celebrate the feminine in your own way, for your own reasons. They could be to honor a mother or grandmother. Or a childless aunt. Etc. Sometimes these pendants have stories behind them and sometimes they don’t. Sometimes they’re just pretty and can be made to match an outfit. Meanings and appearance of the beads will vary because people do.
Karen A. Scofield’s Polymer Clay Goddess Tutorial
Note: This tutorial assumes that you have some basic knowledge of polymer clay but also includes necessary information and links to assist, inform, or inspire if you’re inexperienced. Links may contain information, where to buy, or even how-to videos. More experienced polymer clayers may follow along by reading only the bolded font description in each step.
👉 The glass attic is in excellent pretty exhaustive resource page. So is The Blue Bottle Tree

Goddess clay cutters sometimes come in different sizes.
👉🎉 Update: Instead of using templates, goddess clay cutters are now available, have been for at least a few years now. You can find them on places like Etsy. My favorite are from ClayBoxSupplies (CA) or Delicuts (PL) but you may find others. Some goddess polymer clay cutters allow you to gently squeeze them as you cut, thus making narrower figures, if you like. I like to collect them when I see them, when possible, because sometimes shops disappear.
👉 This is an intermediate to advanced project and is not suitable for children. It involves raw plasticizers, an X-Acto Knife, sharp or pointy clay tools, mica powders you don’t want to breathe in (wear a P100 mask available from hardware stores or online), a higher level of attentiveness, baking, sealing, and mindful clean-up. The constant mindfulness present while successfully creating something like to get the exact results you want is probably a good example of why artists and other creatives tend to have more gray matter. Yay, arts! I’d say this is a tutorial for adults and maaybe some mature but still very well supervised teens that have very good hand-eye coordination.
Note: Read the directions first. Work on a clay mat or other protective surface. A cheap glossy tile from the hardware store is a prime option. Put a towel on the table underneath it to protect surfaces. Before taking any breaks, clean off your hands with baby wipes that have some rubbing alcohol in them. Raw plasticizers in uncured polymer clay can melt or mar furniture finish, the markings on some oven dials, etc. I once “melted” off all the temperature markings on a toaster oven dial because I didn’t wipe things down. I didn’t happen instantaneously but imagine my horror when when I came back to use the toaster oven and I couldn’t read a single temperature point on the dial. There is a section at the very end for cleaning up after you’re all done.
Time: 1. Hands-on time for unsealed pendants is probably 1 to several hours if you include baking time. 2. Actual time from start to finish will probably be 1 to 3 hours, or even a week for sealed pendants, depending on how you seal your beads and your room conditions. To clarify, polymer clay itself does not need to be sealed but mica powders like Pearl Ex do if they are going to experience any wear, otherwise they rub off. Resource “Do You Have to Seal Polymer Clay?” covers your basic options.
Steps
Note: Avoid touching eyeglasses with your hands when you have raw polymer clay plasticizers on them, from handling raw clay.
1. Make a paper template the size you wish your finished pendant(s) to be. Mine were around 2”. You may have your own preferences. You may draw your own goddess or print a copyfree version found online. You can use Irfanview or other photo manipulation to shrink goddess shapes to size. https://download.cnet.com/IrfanView/
👉🎉 Or buy goddess clay cutters from places like from ClayBoxSupplies (CA) or Delicuts (PL).

If drawing freehand, fold paper in half, draw one half of the goddess, cut it out, and lay the template flat for a symmetrical goddess template. Or you can use asymmetry to suggest motion. 1 to 3 inches long is a common length range for these. My favorite size is just over 2 inches long. I use small, curved craft scissors or cuticle scissors to cut the paper.
Put templates safely aside for a moment.
2. Choose your clay. Sculpey Premo is my favorite versatile clay but suitable polymer clays include Premo, Pardo Jewellry Clay, and Fimo Professional Clay. In the US, you can probably find Premo or Fimo Clasic in craft stores like Michaels or Jo-Ann Fabric and Craft Store. You may have to order Pardo Jewellry Clay or Fimo Professional from an online source. If you have decently darker scrap clay made from artist grade polymer clays like these, you could dress it up with mica powder. Want to use scrap clay & make it really black? Try Kato’s Blackout–you only add a little.
A Few Notes on Temperature and Polymer Clay — To stiffen polymer clay, before making bead holes in raw polymer clay, pop it in the freezer for 15 minutes first. Store uncured polymer clay in a cool, dark, dry place or buy them just before use. Never leave raw polymer clay in a hot vehicle or sunny windowsill. On a sunny day that’s 80 to 100°F, the temperature inside a parked vehicle can reach 100 to 172°F. Try to avoid ordering your polymer clays during the summer heat since heat inside transportation vehicles can partially cure your clay or make it much harder to condition.
3. Create a dedicated, clean work area. Why work over clay friendly mat, ceramic/marble tile, a clean sheet of glass, or a piece of waxed paper? You don’t want to get the raw clay residue on your furniture, rug, food, etc. The raw residue within uncured polymer clay has plasticizers in it, so it can chemically alter the finish on some furniture and other surfaces. I’ve worked on some thick dog food bag plastic that’s been cut down to size, cleaned, & taped it down, using masking tape.
4. Set up. You will need:
- Baby wipes: Add just a bit of the rubbing alcohol to them if they don’t contain alcohol. Some acrylic rollers should not be cleaned with rubbing alcohol.
- 91% isopropyl alcohol (rubbing alcohol) or hand sanitizer containing rubbing alcohol
- Mica powder: (Pearl Ex is a popular brand for use on polymer clay) or shimmery powder eyeshadow — Optional. See: Mica vs. pigment powder.
- P100 Face mask: While makeup formulations often contain mica, the difference lies in the particle size and additional ingredients that may prevent such airborne dispersion. Inhaling fine particles of any substance can irritate the respiratory system and potentially cause health problems. Pearl Ex MSDS actually does say not to breathe it in & to wear a P100 mask, found in hardware stores & online. If you film carefully while somebody applies most mica powder to Polymer clay, it is flying up in the air like crazy if it’s a super fine particle mica powder, which most of it is.
- Claying tools and/or appropriately sized metal knitting needles
- Note: You could do the smoothing and assist design with a toothpick, a knitting needle, or an embossing stylus tool (ball stylus) but a few other tools can come in handy.
- X-acto knife or other thin-bladed item.
- Acrylic roller or marble rolling pin to roll clay out with a smooth, even surface. Do not use a wood rolling pin, sorry. The side of a glass bottle might suffice if not rounded, textured, or tapered. It’s amazing how much you could do with the things around you, if you’re determined.
- Rubber stamps and/or homemade stamps that you can make with scrap clay or pencil erasers. Optional
- Small dedicated cosmetic brush for applying the mica powder. Optional, because you can also apply it with a finger and because you may choose not use any powders for surface treatment. If do choose to use a brush, you should keep it for polymer clay work only. That’s what dedicated means, in this context.
- Small dedicated cutting surface (the one I use is only used for polymer clay work). People most often use an inexpensive glossy ceramic or glass tile from a home improvement store, a mirror tile, or a piece of tempered glass. There are also cutting mats you can often find at dollar stores. I love working on the glass or ceramic tiles because they can go straight into my baking pan & into the oven!
- An oven-safe container with lid. Use 2 terra cotta saucers, oven pans, or disposable aluminum baking pans of the same size that can safely clamshell, one covering the other. Or any suitable enclosed oven pan. Ideally, your glass or ceramic tile fits right into them. Save this baking container for only polymer clay. Hint: 2 binder/bull clips of suitable size can help hold clam-shelled pans together. The clips are optional but make things easier.
- UV Resin or Water-based Varathane — Water Based Varathane Diamond Polyurethane Interior is what older cans said. Newer cans are labeled Varathane Polyurethane Heavy Use Formula Interior Water Based Crystal Clear (Gloss Formula). The gloss formula manufacturer’s number is 20041H and UPC code is is 026748200045. I found mine at Menards. Home Depot and Blain’s Farm & Fleet also sell it. Or you can use Pearl Ex Varnish but you’ll have to order that online. Optional: You only have to seal polymer clay if you use certain surface treatments like mica powders or powdered eyeshadow.
- If you don’t already have a magnifying lamp, you might consider getting one but it’s not mandatory. Optional.
5. Wash your hands and mind what you wear. Wash your hands thoroughly, dry them, and make sure you’re not wearing clothes that shed fibers (a fluffy bathrobe or sweater, for example). Avoid working near the dryer (lint will end up in your clay) or other things that create dust or shed fibers/hair. Polymer clay is tacky by nature is like a lint, dust, and fiber magnet.
Tip: Rub your hands and work surface with dedicated scrap clay to pick up any last fibers or hair you’d swear weren’t there after washing & drying your hands. This should always be your final step before working the clay. You can use this dedicated scrap clay over and over again for this purpose.
6. Condition your polymer clay. Take out enough polymer clay to roll out and cut a few beads. A 2 oz. block or two might be more than enough, depending on how much you want to make. You condition it by smushing it and rolling it in your hands until it’s pliable.
Conditioning Resources:
- Conditioning How-to Page: http://www.polypediaonline.com/133688/Polymer-Clay-Conditioning
- Conditioning Resource: http://www.glassattic.com/polymer/Conditioning.htm
- Conditioning Video: http://youtu.be/8a_q2M4KKt0

7. Roll out your polymer clay. You can roll it out to about 5 mm to about 1/4″ thick. If you make it too thick, it may be more difficult to cut without distortion. I sometimes use a heavy marble rolling pin for my polymer clay because it makes the job easier but I also use acrylic ones made for polymer clay arts. As you roll, turn and flip the clay to create a smooth, uniform thickness. The last time you turn or flip the clay, you will roll it to stick well to the surface.

8. Lay out the template(s) and cut. Your clay is still stuck to your work surface. This is why I like to work on glass or glossy tile. It sticks well to slick surfaces like these. You will not cut through at once. That creates too much distortion. Go around at first with a straight up and down, tentative cutting line, while making sure not cut, shift, or push the template into the clay. Go around several more times, again cutting straight up and down, as opposed to cutting sideways at a slant. Cut the outer outline first, starting from the top of the figure to the bottom. Once the outer cutting is done, use the same cutting technique to make any inside cuts, like around the head and inside of the arms. You may have to help the inside cuts along with curved cuticle scissors or fine, curved craft scissors. Just keep in mind not to rip, slice through, or distort the bead. This is not a job for the heavy-handed.

9. Smooth the cut edges while still keeping the goddess stuck to the cutting board. Personally, I find it useful to work under a magnifying lamp at this point, much of the time. You will use your fingers and/or clay tools to round your cut edges. Maintain a light-handed touch to avoid too much distortion.
You may periodically take out the template and line your clay up with it.
Smooth your inner edges too, if applicable to your design. As you work, repeatedly check your template against your work and adjust your clay figure as needed. It may help to look at your clay goddess in a mirror check to check for asymmetry or errors.
I’d lift my clay from the tile to smooth & such only if I were confident I could stick it back down and I wouldn’t distort it too much. Do what’s right for your design and abilities.

10. Stamp. Stamps can be dusted lightly with cornstarch or you can give the surface of the rolled out clay a spritz Armor All (yes, from the car care section of your store) before stamping your clay. Page on releases & polymer clay. Excess can be gently patted off after stamping. Fimo gets a bit mucky with water so keep that in mind if you see videos successfully misting other clays with water before using cutters. You can create your own polymer clay stamps or use commercial ones. A popular stamp for Goddess bead designs is the simple spiral. You can use molds that indent designs or that create raised ones. Expect to smooth out any unwanted ridges the edge of the stamp might create and touch things up.
If using commercial stamps, check to see if you can make derivative works if you plan to sell the resulting beads.
Stamp and Texture Sheet Resources:
- Resource on Stamps and Texture Sheets: http://www.polymerclayweb.com/techniques/stampstexturesheets.aspx
- Video on Making a Polymer Clay Stamp: https://www.youtube.com/watch?v=GOo0nBpLPdw
- Search for “Polymer Clay Stamps” on Pinterest or check out Pinterest boards like this one: https://www.pinterest.com/donnadecicco/make-molds-clay-tools-texture-sheets/.
Optional: Bead Holes. Chill your beads in the freezer for 15 minutes and gently use a sewing needle, pin, toothpick, skinnier juice box straw or polymer clay hole cutters to create your bead holes. If not using a straw or metal hole cutter, you may or may not have to run your bead hole tool into the hole from both directions while avoiding bead distortions.
11. Add breasts if you want. Create two equal sized balls and lightly press onto the body of the bead without distorting them but press hard enough that the breasts stay attached and smooth clay toward the top of each breast. Breasts are best added after stamping but can often be added before, depending on your mindfulness and the size of the stamp. Just be careful not to smush them when stamping on the design if you add a bosom first.
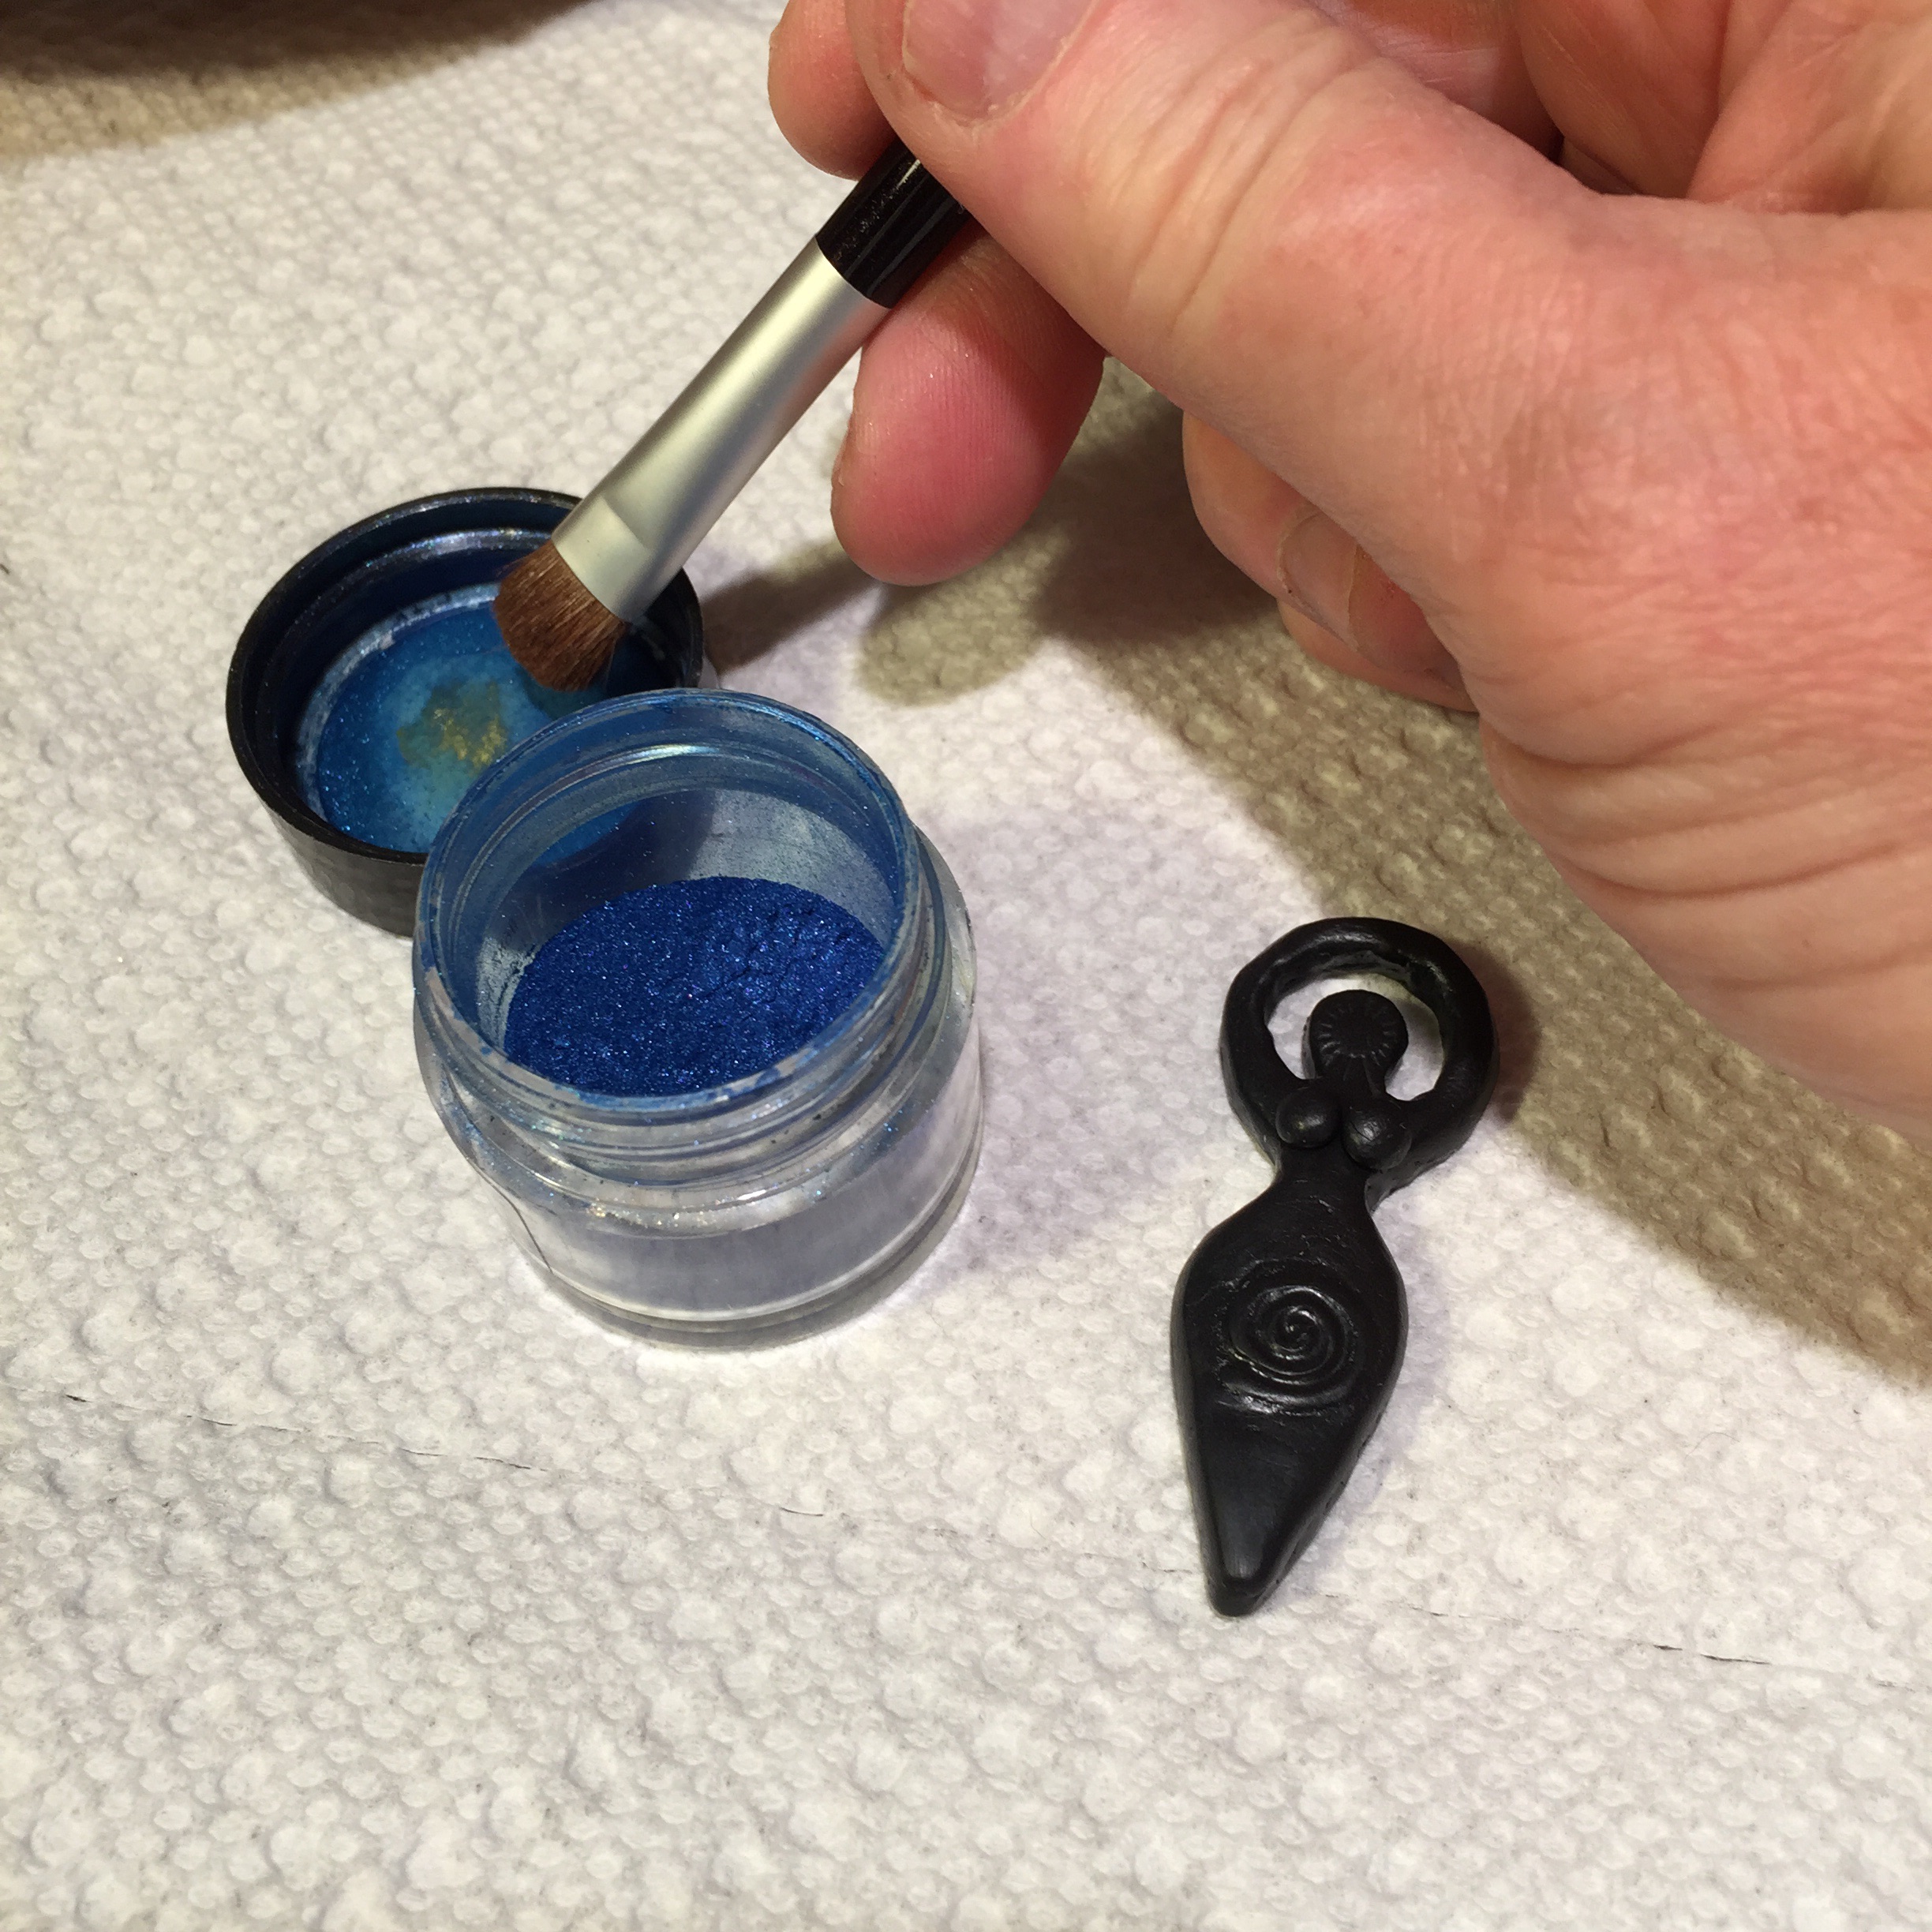
12. Mica powder (optional). Wear a P100 face mask to avoid breathing in the mica powders. Personally, I find it best to work under a standing magnifying lamp at this point. 1. You can apply a lightish layer of mica powder with the pad of your fingertip. 2. You can apply mica powders to small, itty bitty stamped designs with the head and side of a simple flat head sewing pin. Dip the pin lightly in the mica powder, perhaps lightly tap off the excess, and apply (rub it onto the clay) while avoiding dropping clumps of mica powder onto the clay. 3. For coating the rest of the bead’s surface with Pearl Ex mica powder, use a small, dedicated cosmetic brush, one small enough and soft enough for the task. I often will get the mica powder off the inside of the mica powder lid and then apply it to the bead, perhaps occasionally adding a tiny bit to the lid in order to reload the brush. Lightly but thoroughly brush it on your bead. You will not want the brush so loaded with mica powder that it’s coming off all over the place as you apply it to the bead. You want to load it with just enough in order to gently apply it to the surface. Easy does it. A little goes a long way!


13. Now that your bead is coated with the mica powders, place it on it’s final baking surface, double check your bead’s alignment and arm placement against the template 1 last time. Before touching anything else, now wipe your hands with a wet wipe containing a bit of rubbing alcohol, or apply hand sanitizer and clean off with a wet wipe, and then thoroughly wash your hands with soap and water.
Many people bake on a glossy ceramic tile placed inside clamshelled disposable aluminum cooking pans held shut with metal bull dog clips. Personally, I used two terra cotta saucers from the garden section, of the same size, and invert one over the other to create an enclosed baking container. Baking on glossy surfaces like glossy ceramic tile or glass can create irregular, shiny spots on the underside of your beads. This can be remedied but it takes an extra step & some acetone or s sander & buffer. You can also bake on paper to avoid the shiny spots on the undersides but should only place your items on the paper right before baking, else the paper can leach at the plasticizers from your clay.
14. At minimum, follow the clay manufacturer’s directions for baking the clay. You’ll have to know how thick the thickest part of the bead is and what temperature the package says to bake the clay at — these will tell you have long and how hot to bake your bead . You will use an independent oven thermometer or two; Sculpey sells them for clayers. Oven temps, either regular ovens or toaster ovens, spike from time to time during the baking cycle. Baking in enlcosed baking containers helps avoid burning that can occur during the temperature spikes. Many ovens, even the best home ones, are not at their stated temperature even at their hottest for a particular setting. That’s why you want to an independent of the thermometer. I should mention though, that beads will be stronger if you bake them for 2 or more times the recommended baking time, and that’s fine for polymer clay like Premo, but not all polymer clays will react the same to longer baking times. If in doubt, look it up and do a test piece!
15. Let the bead cool down in your baking pan before handling. This so you don’t burn yourself or mar the clay with a fingernail. Clays are often softer when hot out of the oven than they are after they’ve cooled. It’s normal for polymer clay to be a little bendy when warm out of the oven, by the way. Some clays remain a little bendy after cooling, and that’s normal.
16. Seal — Brush on thin layers, or dip (sealing bare clay is optional if you didn’t use mica powders). Why seal? If you don’t seal a bead coated with mica powders, it will dull and the mica powders may wear of on your skin and clothes. UV resin is one option (link is a how-to). It’s now my fav, personally. I also love Pearl Ex Varnish. If I use their Varnish, I will use at least several layers of it impregnated with the mica powders.
Varathane is another & it’s low odor, cleans up with soap and water, is sold at some hardware stores or online, and is pretty durable. To prepare, you will stir the Varathane slowly, let it settle for an hour or so with the lid on, then put some in a smaller container that has a good lid. Leave enough space because you’re going to thin it a bit with water. Stir slowly and carefully to avoid air bubbles. Apply the Varathane, let it dry a couple of days, apply again, let dry, apply again, let dry. It’s better to do several thin coats than one or two thick ones. Read the label for drying times. Avoid build up of the Varathane at the bottom of the bead but don’t scrape the bead while getting excess off. Some people scrape off the varathane without actually touching the bead and some spin the bead (without dropping it) to get the excess off. Refer to the dipping tutorial and other Varathane pages, below, if you have any questions. You may find it easier to brush it on rather an dip, just be careful to work on a mixed media sheet that wipes clean easily or a glossy, light colored or white, ceramic tile (you can wipe and/or scrape it clean with a razor blade).
Varathane is sometimes chosen because it bonds best with the polymer clay and works very well with the mica powders. It’ll be water-resistant but not waterproof. If your bead design doesn’t have bead holes, you can hang the bead by a thread and dip. The thread can be carefully cut away once the bead is completely dry — cut the thread flush with the bead’s surface without knicking the finish. You can hang your bead(s) to dry with the same thread. If you have bead hole, you can put a beading wire, thread or perhaps even a toothpick through and dip. I used a mask or tie rack to hang my beads to dry because that’s what I had.
Varathane (Sealant) Resources:
- Varathane and Polymer Clay: http://www.polymerclayweb.com/materials/finishes/varathane.aspx
- Varathane — The Best Polymer Clay Sealer: http://thebluebottletree.com/varathane-best-polymer-clay-sealer/
- Do You Have to Seal Polymer Clay? — http://thebluebottletree.com/seal-polymer-clay/ — this site talks about the range of sealers, what to avoid, what’s possibly suitable.
- Tutorial on Dipping in Varathane: http://melobeau.blogspot.com/2014/03/tute-varnishing-polymer-clay-with.html
Resource FYI: About Spray Sealants on Polymer Clay
17. Cleanup: You can clean your polymer clay tools with one of the baby wipes with the rubbing alcohol in them but some acrylic rollers should not be cleaned with rubbing alcohol or they will become covered with little cracks. Dry wipe it with a cotton rag or paper towel after each session, and just occasionally give it a good washing with dish soap. If the plasticizer from Polymer clay make your acrylic roller sticky and cloudy looking, never buy that brand again.
Finished! (But wait, there’s more, if you want to make molds to make multiples…)

Optional — Making Your Own Molds: If you have the materials and know-how, or can youtube how-tos, making your original pendant molds saves you a lot of work if you wish to make multiples. I usually use two-part silicone Amazing Mold Putty. Amazing Mold putty makes it easy to get even more dimensional pendants out of your molds. In the US, Amazing Mold Putty is found in many craft stores like Michael’s or Hobby Lobby and I always use a coupon.
If you intend to use your molds for both polymer clays and resin pendants, check this link on Amazing Mold vs. Easy Mold. I let my mold sit for a day before using resin in it, wash it with warm soap and water, and let it air dry before use. Tip: The smoother your pendant that you mold, the glossier the resin is if you cast one in resin using your mold, and it’ll release from the mold more easily. My favorite casting resin is ICE Resin, if it’s not old. Older Ice Resin yellows in the bottle. Art Resin is an option for thinner beads like this and yellows the least. I think ICE resin is harder though?
(With commercial molds, check if you can use them to make derivative works if you’re selling the pendants.)
Jewelry Design Considerations
Today, I created a bead that I could attach to a necklace using a jewelry bail. That’s why this one didn’t need bead holes. If your bead and jewelry design called for bead holes, then you have to decide which direction the bead hole(s) will run. Bead holes can be added before or after baking. You can use a small juice box straw or a needle to create a bead hole, just make sure the hole is wide enough for any cords or findings used.
Jan. 15, 2015 Update…Possibilities
This time I used molds I made based on prototypes I made using the above method. They were coated with Aztec Gold Pearl Ex mica powder, except for one blue bead. I will yet add colored resin with glitter/mica inclusion and other touches, including finally sealing them in water based Varathane Interior, gloss. In the stars, such as in the bead on the right, below, I could use different chakra colors — or whatever else strikes my fancy.


Leave a comment