2 Notes: These are not finished beads, they are WIPs (works in progress) meant to show the faux opal qualities and not the entire process of creating the pendants. Resources on finishing the beads will come at the end of this article, along with a visual example of a resin faux opal prototype, for comparison.
Attempt #1 — Reveals Both Positives and Mistakes

Notes on First Attempt
- Pardo Art Clay Translucent Polymer Clay — It’s one of the more translucent clays that lacks any yellow tint that some translucent polymer clays have. I had to order most of mine online. It’s nearly as transparent as glass in thinner, cured layers but very much like milky white, translucent faux opal in a much deeper bead like this. It can be dyed with tiny amounts of translucent alcohol inks for faux opals.
- Oven Temperature — This bead was baked at 300 – 315 (watch temperature spikes) degrees F for 2 hours because of its thickness.
- Temperature — While these temperatures are close to the ambering point for this clay, pushing the baking temperature to this clay’s higher limits increases the clay’s transparency.
- Baking Pans — You need oven you can trust not to spike too hot and an enclosed baking tin/pan with glossy ceramic tile in the bottom of it. Many polymer clay artists buy two heavy metal pans of the same size that they can clamshell — place one over the other as a lid and use metal bulldog clips to ensure it stays closed, as opposed to the top pan sliding off as you move it. If you do use two pans with one over the other as a lid, then make sure the lips of these pans create a satisfactory seal. You can place the glossy ceramic tile(s) inside the bottom pan as a heat sink that will serve to even out the temperature. You may also wish to cover the opening of the bottom pan with aluminum foil after placing your beads inside. Then place the top pan over that and clip them together if necessary. All this helps avoid ambering (yellowing) or outright burning your beads.
- Test — Test your oven while empty and note its temperature range as it cycles between lower temperatures and temperature spikes caused as the elements heat up. Know that all toaster and conventional home ovens cycle and that you don’t know your oven’s range if you didn’t monitor it nonstop for at least 30 minutes. It can also help to have not one but two independent (not built in) oven thermometers to read. Monitor at least one 30 minute cycle and do at least one test bake with a sample bead of similar composition, size, and thickness. Monitor the oven’s temperature range periodically over the oven’s lifetime and if there is any question regarding its temperature.
- Premo White Polymer Clay — It’s a great clay and I used it as a back layer of clay during the molding process. Unfortunately, some of it broke through to the bottom of the mold (the front of the bead) and it’s very opaque and isn’t opal-like. It does give contrast to the far more translucent Pardo Art Clay though.
- Arnold Grummer Iridescent Flakes — These are translucent yet flash colors at you as the glitter flakes catch the light. You can get white, green, and blue versions. These are ideal for faux opals due to these two characteristics. They can also be dyed with tiny amounts of translucent alcohol inks for faux opals, should you desire to do so (optional for faux opal).
- Not All Glitter is Equal
- Darker and/or Opaque Glitter Flakes — I used Iced Enamels Susan Lehart Kazmer “Shattered Fire Opal.” Note: The “Shattered Fire Opal” glitter flakes in this brand are dark and very opaque while the “Shattered Opal ones are not. Darker glitter flakes are not attractive in this type of faux opal because while they glimmer “fire” at you with delightful plays of color when turned one way but appear dark and opaque when turned the other way when not catching the light. The same is true for most holographic glitter.
- Rule: Dark + Opaque = Contrary to this type of faux opal.
- The Shattered Opal flakes of the same brand are light, translucent, and very prime for faux opal, however.
- Darker and/or Opaque Glitter Flakes — I used Iced Enamels Susan Lehart Kazmer “Shattered Fire Opal.” Note: The “Shattered Fire Opal” glitter flakes in this brand are dark and very opaque while the “Shattered Opal ones are not. Darker glitter flakes are not attractive in this type of faux opal because while they glimmer “fire” at you with delightful plays of color when turned one way but appear dark and opaque when turned the other way when not catching the light. The same is true for most holographic glitter.
- Aztec Gold Pearl Ex Powder Impregnated Liquid Kato polymer clay — Totally optional. I fact, I don’t think I like it.
Attempt #2 and Notes on This Unfinished Bead
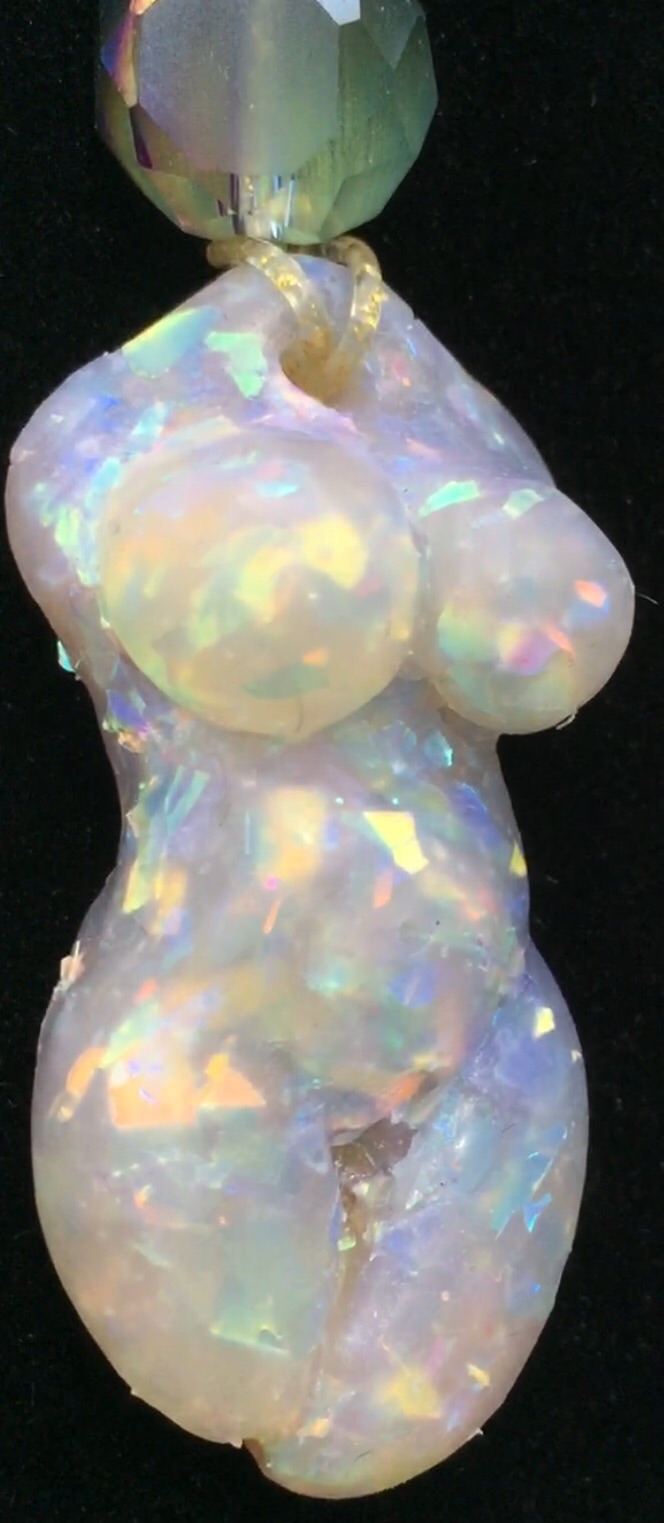
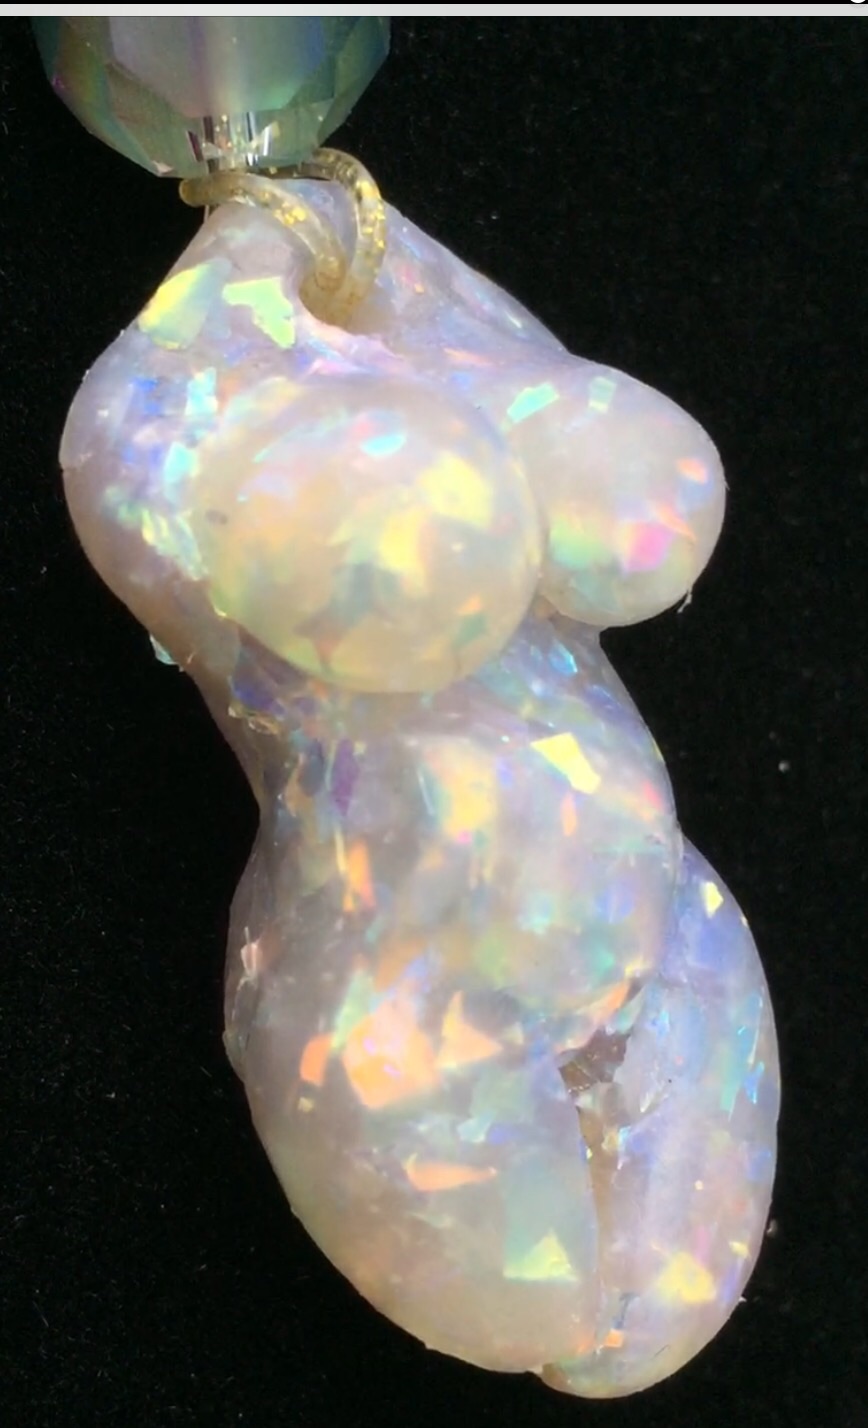
First, some shots of the successful bead to show translucency and opal fire.


Tutorial
I have a background doing lapidary work with opals and still have a few Australian white opals on hand, and that helped.
So, after ambering (yellowing, due to higher heat in this case) one bead from a 2nd batch, I lowered the temperature 5 degrees F on my oven down to 298 degrees Fahrenheit by the dial, which means my oven actually gets up to right around 300 to 315. I baked these for 2.25 hours at that temp since these beads are close to one inch thick at the thickest point. Success!
Watch out for the variations at the end of the steps!
Notes: Wear clean disposable gloves during the entire process and clean your work station first with alcohol wipes and then with light colored scrap clay. Wipe down the mat and the pasta machine this way too. It picks up dust and other fibers or any leftover pigments.
Tutorial Steps
Remember: Avoid layering complementary colors one over the other, green over pink/red/orange for example, as it will muddy colors.
- Condition Your Clay — Condition three separate pieces of Pardo Art Clay Translucent.
- Color Your Glitter Flakes — Optional! — Color three separate batches of Arnold Grummer Translucent Glitter Flakes in bright yellow, bright green, and blue-violet, using transparent Adirondack alcohol inks. Easy does it. I used those tiny paper dixie cups, probably filled it 1/3 and used one drop of ink to color. Stir right away, rapidly enough and thoroughly. As for brands, you can also use “Iced Enamels Susan Lenart Kazmer Shattered Opal” glitter flakes. The inks: http://rangerink.com/?product=tim-holtz®-adirondack®-alcohol-inks
- Color Your Clay — Optional! Color bits of the conditioned Pardo Art Clay Translucent with the same alcohol inks, if you colored your glitter flakes. Easy does it, that alcohol ink is strong. For example, I did was not even use a whole drop but I touched what leaked out of the ink nozzle to my gloved finger, almost let it dry, quickly touched it to the clay, let dry 30 seconds and then mixed it into about 2/3 to 3/4s of a Pardo Translucent Art Clay per color.
- Mix Clay and Glitter Flakes — Mix like colors of clay and dried flakes together — roll clay in the pasta machine, sprinkled with glitter, pat down, fold clay on itself, roll out, sprinkle with glitter, and do that until you’re satisfied with the amount of glitter. Then roll each color clay into separate long ropes. As you work the clay, you pick up the escaped glitter flakes.
- Twist Ropes Together — Twist the three different ropes together tightly, scrunch them up tight getting the air out.
- Roll and Twist Once More, Then Half It — Roll the combined clay into a long rope, double it up on itself, twist it again, scrunch it up shorter while squeezing the air out to prevent air bubbles, cut in half lengthwise.
- Roll Each Half — Pinch the long end of each half of the cut rope and put it through the pasta machine starting from the 2nd thickest to the thinnest.
- Build Up Layers of Clay In Your Bead Mold — With a shallow mold, most cabochon molds for instance, you might run some of the translucent clay through the pasta machine on the very thinnest setting and lay that down in the mold first. This helps prevent glitter from poking through. In my Goddess one, however, the clay tears and breaks as I try to place an initial, thin, translucent sheet of clay into the deeper, more curvy parts of the mold. So for deeper, more complexly shaped bead molds like this, skip the initial very thin layer of plain transluent clay and just lay down bits of the sheets of the rolled out glitter clay. Cut appropriately sized sheets of the opal clay with sharp craft scissors and press into a silicone mold. Press the layers together well. (I made my molds from Amazing Mold putty.)
- Color Trick, That Extra Touch — When about half way to 2/3s of the way filling bead in, carefully place bit of interference type of Pearl Ex powder in streaks here and there. Use a clean, dedicated synthetic brush, pick up a slight amount of Pearl Ex Powder from the inside of the Pearl Ex container, as opposed to dipping your brush directly in the jar’s contents, and draw it across the exposed clay in the mold. Less is more — you’re going for a hint of green or violet in a few streaks and they have to be very sheer. Try to lay like color over like rather than green over glitter flakes or clay that have an orange color, for example. Don’t coat all of the exposed clay. Use one to to four small streaks at the most, and place them in an organic, random manner rather than side by side to each other. Continue filling the bead with your opal clay.
- Fill Mold Until Clay is Flush — Press the clay into the mold until the clay is flush with the mold. You really want to smash it in there. This also helps prevent glitter from poking through the front of the bead, to a great degree. Smooth the back side of the bead and make sure the molds is filled properly.
- Place the Uncured Beads on a Light Colored Glossy Ceramic Tile — For one-sided beads, pop the bead out, back-side-down, onto a glossy ceramic tile and bake according to manufacturer’s instructions. This step assumes you tested both your oven how it may get close to the 315 F ambering point of the Pardo Art Clay for maximum translucency, without actually ambering your bead. It also assumes you have figured out how not to burn your beads. Again, I have glossy ceramic tiles on the bottom floor of my oven and inside a large covered metal tin. I may additionally cover the bead with polyfil to insulate them from the heat fluctuations during normal oven temperature cycling.
- Ice Bath — As soon as your bead is done, dunk it in an ice bath with silicone tipped tongs. Set beads to dry. The ice bath step is optional but many people swear by it.
- Trim and Sand if Necessary — Trim off any glitter that might be sticking out around the back periphery of the bead, the only place they might stick out with this method. You can use an X-Acto knife under a magnifying lamp to cut estremely close. Sand lightly with very fine sandpaper in the areas you had to cut away glitter poking out, if you like.
- Gloss — If you want more of a glossy look, and most people would, buff the bead a bit or add a couple of thin layers of slightly diluted Varathane Water Based Interior Glossy (must be water based!) Or epoxy resin. Or the most translucent liquid polymer clays. My daughter likes it when I add the glossy Varathane. I always rapidly clean the beads with alcohol before adding Varathane but don’t soak the beads in alcohol — soaking in alcohol permanently mars the translucency of the bead. The alcohol interacts with the bees wax then. I lightly sand with fine sand paper before applying each layer of Varathane or epoxy resin. I make sure each layer of Varathane dried overnight before adding the next layer. I add up to three layers this way. More on sealers here.
Variations
Opals come in an amazing array of variety. Why shouldn’t your faux opals?
- Color One — Color only one of the three portions of clay with the tiniest amount of alcohol ink or other translucent colorant. Adding two different colors can result in gray or muddy looking results
- Color None — Color none of the three portions of clay to begin with.
- Skinny Colored Rope Addition at Step 3 — When you get to step three and four, have three ropes of clay rolled out but add an additional but very skinny colored rope for one or two of the three main clay ropes.
- Skinny Colored Rope Addition at Step 6 — Do the same but add the skinny colored rope(s) at the point of step 6, meaning you’ve already rolled three portions out, twisted them, compacted them to get the air out, and you rolled the clay out into a long rope again. It’s at this point you’d add a skinny rope of colored clay.
- Streaks of Interference Color — Don’t color any of your clay with the alcohol inks but when you’re laying your clay in the mold, add a streak or two of very lightly applied interference color of Pearl Ex mica powder. Again, don’t cover the whole layer — just a barely there streak of color. Here’s a tip for loading more lightly loading the brush.
- Opal Glitter in Streaks Added at Molding Stage — Add additional Shattered Opal glitter flakes individually to make streaks in subsequent layers but not in the first layer or two of your bead (you don’t want the glitter streak smashed right to the front of the bead).
- Opal Glitter Streaks and Interference Pearl Ex Streaks Working Together — Add streaks of like-colored opal glitter flakes directly over where you laid down the barely-there interference mica powder streaks.
- And More Interference Pearl Ex in Next Layer to Deepen Effect — Same as above, add some more barely there interference powder in subsequent layer(s).
- Stacked Lighter and Darker Streaks of Interference Pearl Ex — Same as option 7 but add the slightest hint of a lighter color, then use darker interference color in the next layer over it. Avoid using colors on opposite sides of the color wheel so you don’t muddy/gray your bead’s color.
- Ultrafine Glow-in-the-Dark Glitter Touches — With streaks of barely there interference colors of mica powder, add some light colored, ultrafine glow-in-the-dark glitter toward the back of the bead, just don’t do that in the very last layer in the mold. This layer is best done over green, orange, pink colors rather than purples or violets because glow-in-the-dark is yellowish by nature and that’s on the opposite side of the color wheel as violet or purple.
- Fantasy Film and/or Fantasy Fiber Additions — Not while laying down the first layer of clay, but add “streaks” of crinkled fantasy film or snippets of fantasy fibers. Easy does it. It’s probably better to add the rare pieces rather than plaster the clay with the stuff — you want to enjoy the layers of translucency and overdoing it can ruin things. Don’t pick the darker, more opaque colors of fantasy film. Think opal. Do a visual search for all the variations of opal out there. Some of the mylar/fantasy films are perfect for this.
- Paper Bead Style — Great idea for completing a bracelet or necklace design that uses a focal faux opal bead like the above. Create paper bead template(s). Roll out translucent clay. Cut the paper bead shape from the clay with small, sharp craft scissors. Add Arnold Grummer glitter flakes or only smaller pieces of the Shattered Opal flakes as you roll along with fantasy fiber/film snippets, as you like and as what works. Roll onto skewer or appropriately colored glass tube beads. If the bead is thicker once done, you might stamp it with Pearl Ex Powder designs on both sides. Or not. Just don’t forget that you have to have a bead hole in the end. You may edge the clay with gold mica powder before or after rolling the bead. Trim any pesky glitter flakes if they poke out. Before or after baking, add additional minute finishing touches as you see fit in ways that lend to the overall jewelry design. How about those tiny glass/polymer beads in gold as trim on the tops or edges of the bead? What of bead caps that use tiny glass/polymer clay beads and/or the tiniest AB or other pretty rhinestones? Oh experimenting with this is going to be fun.
Binder of Faux Opal Examples with Notes
I’ll keep examples, with notes, stores in a trading card binder. You can pick up clear trading card binder pages even at Walmart.
They’re best if lightly sanded and coated with resin or other polymer clay friendly sealant to make them gemstone-like.
Info on Finishing Polymer Clay Beads
Spray or liquid water-based sealants may not stand up to wear and may have to be reapplied. After having one of my successful beads substantially gray, opacify, and amber, all three, after being worn against skin slathered with sunscreen and exposed to a summer of sunshine, I favor either coating sculptural polymer clay beads with resin, a good epoxy resin. ArtResin would be my top choice, as it’s more friendly to the environment and health but yellows the least with any exposure to the elements/light. See https://www.artresin.com/blogs/artresin/17017757-6-month-uv-yellowing-test-results for video.
- Do You Have to Seal Polymer Clay? — https://thebluebottletree.com/seal-polymer-clay/
- Buffing With A Power Tool — https://www.youtube.com/watch?v=VOJNB-TfrEk
- Varathane — The Best Sealer — https://thebluebottletree.com/varathane-best-polymer-clay-sealer/
- Glossy PYM II Polymer Clay Spray Sealer — https://thebluebottletree.com/pym-ii-polymer-clay-spray-sealer/
- PYMII Availability — http://www.pymii.com/
- Museum Quality Lascaux Spray Fixative — Comes in Matt and Glossy and Offers UV Protection — Not Tacky After Six and even eight months later, was tested on a variety of polymer clay brands — https://www.instagram.com/p/BM2C8b9glZh
- Brush on ArtResin on beads, torch, let rest in a manner that won’t mar beads or cause them to stick to things/eachother — https://www.artresin.com/pages/faq.
Resin Faux Opal
Or one can go ahead and make resin faux opals. FYI —There is amazing array of natural opal and resin opens up possibilities.
.

Leave a comment